Lift and Coast Guide for LMU: Explained with LMP2 at Le Mans
Where to lift at Le Mans and how much fuel strategy it buys. Oreca 07 LMP2 in LMU, built on 150 real laps: a 75 L tank goes from 11 laps to 12 for about 0.03 s per lap.
What lift and coast is
Lift and coast means taking your foot off the throttle a little before the braking point and letting the car roll, with no throttle and no brake. Then you brake as usual. Because the car arrives a little slower, you can brake a little later.
While the car rolls, the engine uses almost no fuel. You give up a little lap time and save fuel in exchange.
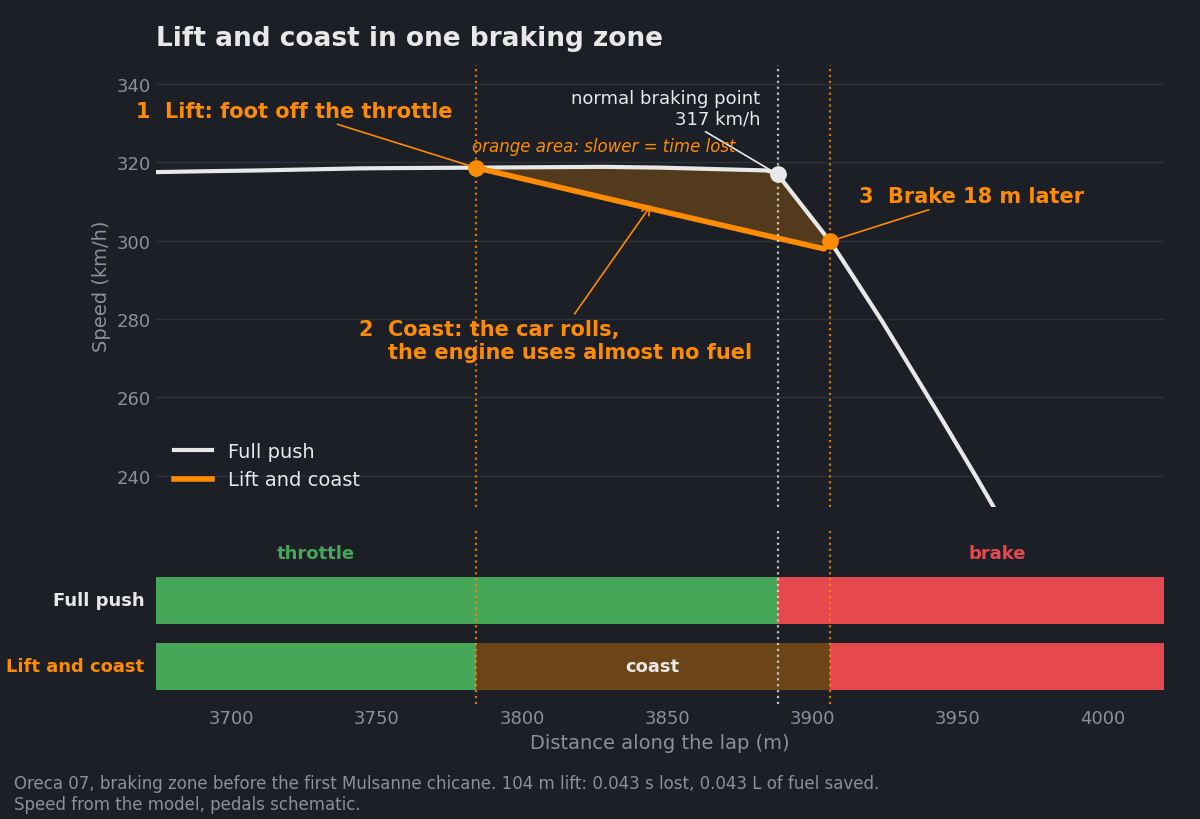
The white line is a full push lap: full throttle up to the braking point, then hard on the brakes. The orange line lifts 104 m earlier. The car rolls and loses speed, so it reaches the braking curve 18 m later than the normal braking point. The orange area is the time this costs: 0.043 s, for 0.043 L of fuel saved. The bars below show the pedals: the lift lap trades a little throttle at the end of the straight for a short coast and a later brake.
Why it matters
Fuel decides how long a stint can be. One lap more per tank can save a pit stop in a race, or let you stop later than the car in front. Sometimes the race length decides it. In a 90 minute race one lap more per tank saves a whole stop (section 5). Lift and coast turns a little lap time into fuel, in small and controlled steps.
It can be done well or badly. Every metre of lift costs time, and not every metre costs the same. Before the first chicane on the Mulsanne straight, lifting costs about 1 second per litre saved. A 104 m lift there saves 0.043 L for 0.043 s. Before a slow corner the same lift costs 6.6 seconds per litre. Lift in the wrong place, or too long in one place, and you pay several times the price for the same fuel.
Seen from the pit wall, this is a clean engineering problem. Every braking zone has its own cost curve: litres saved against seconds lost, getting steeper with every metre. The best answer is to always take the cheapest litre next, wherever on the lap it is, until the target is reached. On top of that sits the race strategy: stint length, start fuel and the number of stops. This guide works through all of it with one real example.
The short version
- A full 75 L tank gives you 11 laps at full push. With a little lift and coast you get 12, for about 0.03 s per lap.
- As a standard stint, 13 laps per tank is too expensive: almost a second per lap. In a 24 hour race the plan is built on 12 lap stints, with a few stints of 11 or 13 laps where the race length or the tyre strategy needs them.
- In a 90 minute race, one stop with lifting beats two stops at full push by about 20 s. In a 2.4 hour race lifting does not pay.
- Lift at the end of the fast straights. The same lift before a slow corner costs 6.6 times as much per litre.
- Short shifting saves fuel too, but per litre it costs 16 to 127 times more time than lift and coast.
- In the laps where they saved fuel, the drivers in our data lost about 0.05 s per lap against the optimal spread of the same litres.
1. The example: Oreca 07 at Le Mans
We looked at 150 clean laps of the Oreca 07 (LMP2) at Circuit de la Sarthe in Le Mans Ultimate. Four drivers, 27 sessions, driven between 19 September and 23 October 2026. Two of the drivers did 146 of the 150 laps. Every lap carries its fuel level, gear, rpm and tyre data along the lap.
- Tank: 75 L. Fuel per lap, measured: 6.01 to 6.50 L, median 6.26 L.
- The reference lap at full push (3:34.732) uses 6.36 L. 75 L divided by 6.36 L is 11.8, so 11 full laps.
- Median clean lap: 3:37.377.
Our data contains the pit stops too. This guide looks at fuel strategy only and keeps it separate from tyre strategy. So for every stop we use two fixed values from our strategy model: 30 s to drive through the pit lane, plus refuelling at 2.5 L/s. Section 3 shows how far you can change them before the answer moves.
Before you plan your own race, measure your fuel per lap over a few clean laps. Section 3 shows why this number matters most.
Labels in the charts: MEASURED = from the laps, MODEL = simulated on the reference lap, ASSUMED = an input value we chose.
2. Why 12 laps is the sweet spot
Spread the pit stop over the stint and you get its cost per lap. Add the time you lose by lifting. The lowest total wins.
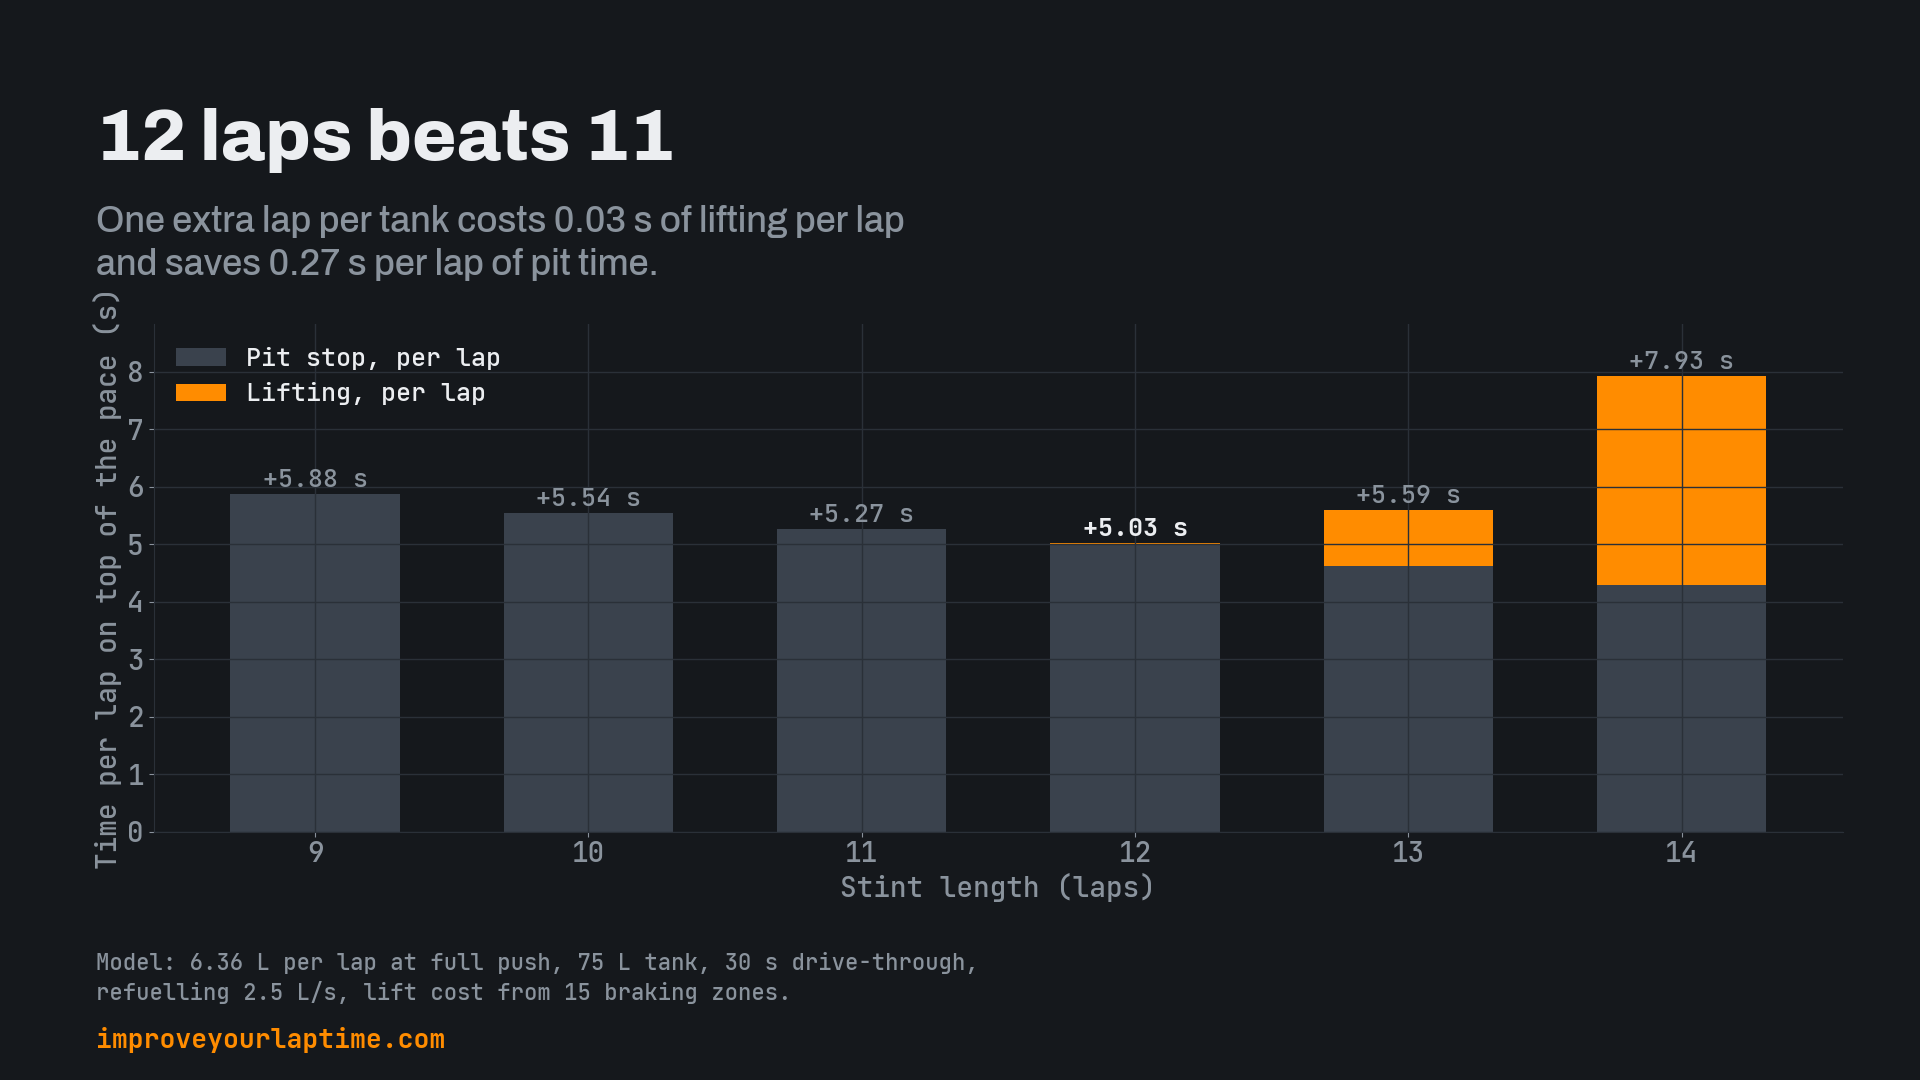
- 11 laps: no lifting needed to reach the stop. The stop costs 5.27 s per lap.
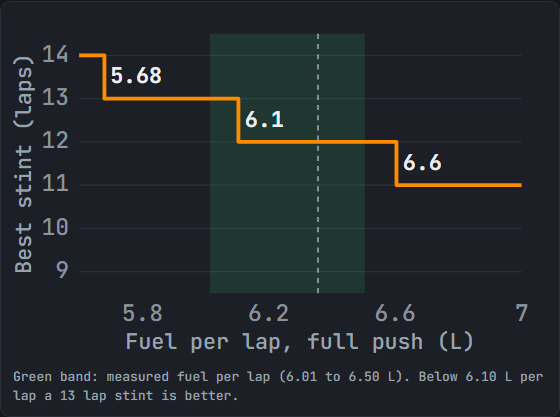
- 12 laps: you need to save 0.11 L per lap. That costs 0.03 s per lap. The stop drops to 5.00 s per lap. Total 5.03 s.
- 13 laps: you need to save 0.59 L per lap. That costs 0.98 s per lap. Total 5.59 s, worse than 11 laps.
- 14 laps: 1.00 L per lap to save, 3.65 s per lap of lifting. Total 7.93 s.
So in a long race, averaged over every lap, a 12 lap stint is about 0.24 s per lap faster than an 11 lap stint. A shorter stint carries less fuel on average and the car is a little lighter. With an assumed 0.030 s per kg that is worth 0.06 s per lap for 11 laps, so 12 laps still win by 0.18 s per lap.
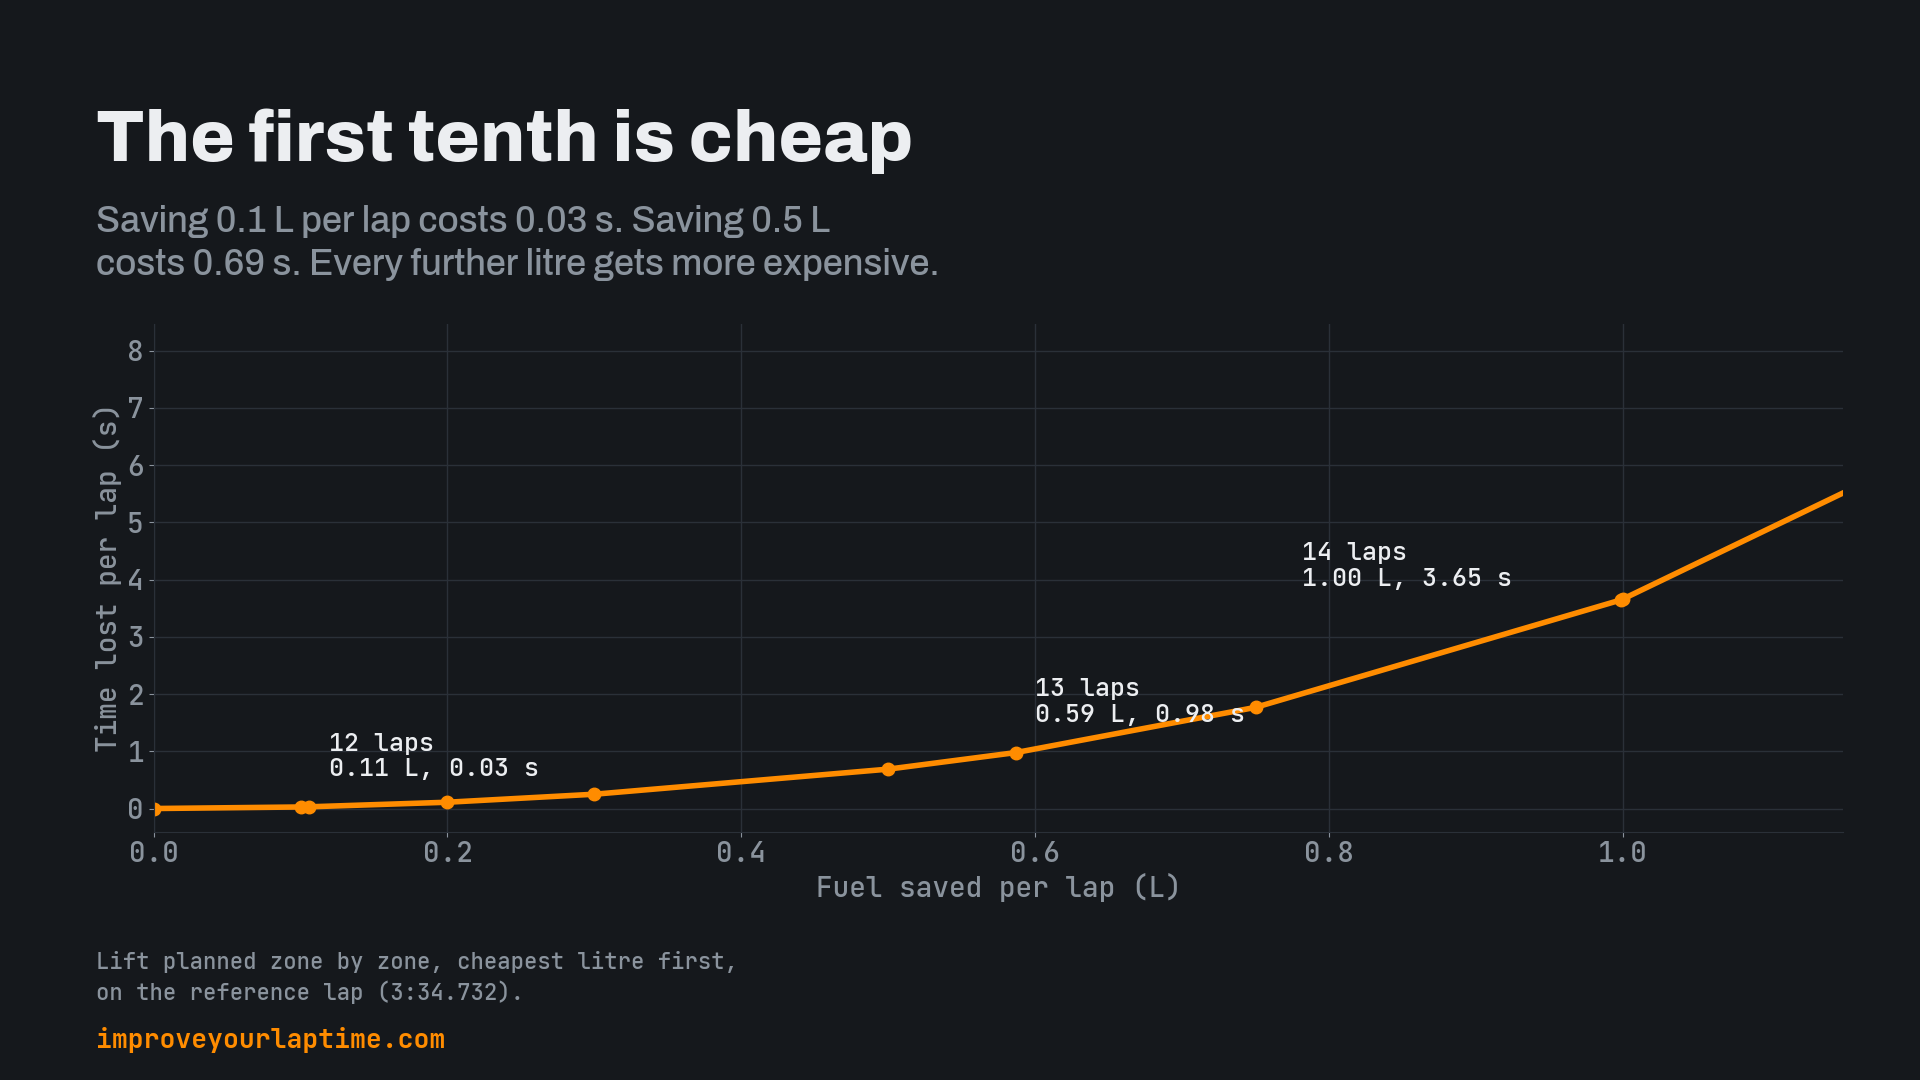
The lift cost comes from the reference lap, braking zone by braking zone. It assumes the lifts are spread perfectly over the lap, so you always lift where the next litre is cheapest first. The first tenth of a litre is almost free. After that it gets expensive fast.
One braking zone, step by step
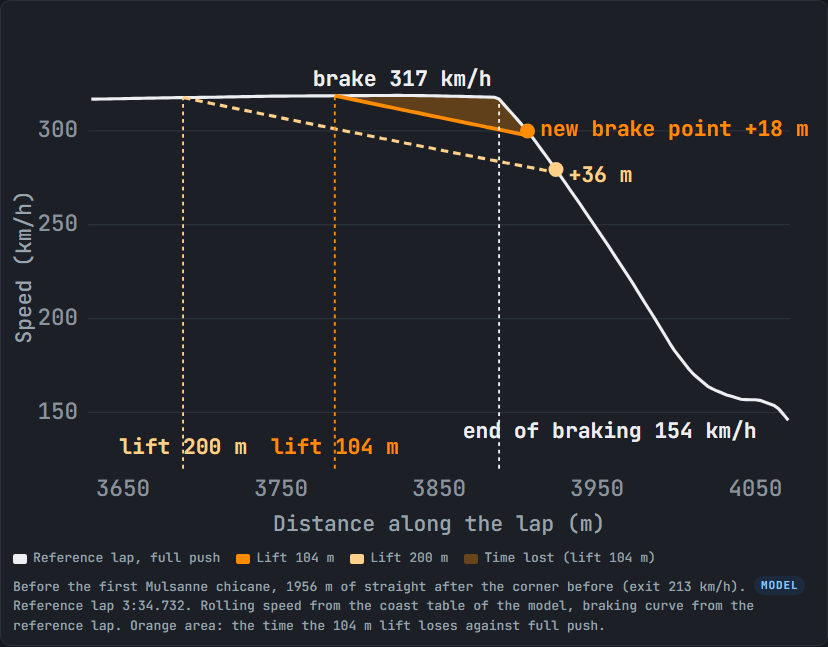
Here is the braking zone before the first chicane on the Mulsanne straight. At full push the car brakes at about 317 km/h. A 104 m lift lets it roll, the braking point moves 18 m later, and the lap loses 0.043 s for 0.043 L of fuel, about 1 s per litre. A 200 m lift costs 0.169 s for 0.083 L, about 2 s per litre.
Why is this zone so cheap? At the end of a long straight the car no longer gains speed. On the reference lap it stays at about 317 km/h for the last 60 m before braking, so lifting there gives up almost no acceleration. Most of the speed the car loses while rolling would have been braked away anyway.
Which corners pay
Speed at the braking point decides most. Before the first Mulsanne chicane a 104 m lift costs 1.0 s per litre. Before Arnage (200 km/h after 180 m of straight) the same 104 m cost 6.6 s per litre, because there the car still accelerates at full throttle.
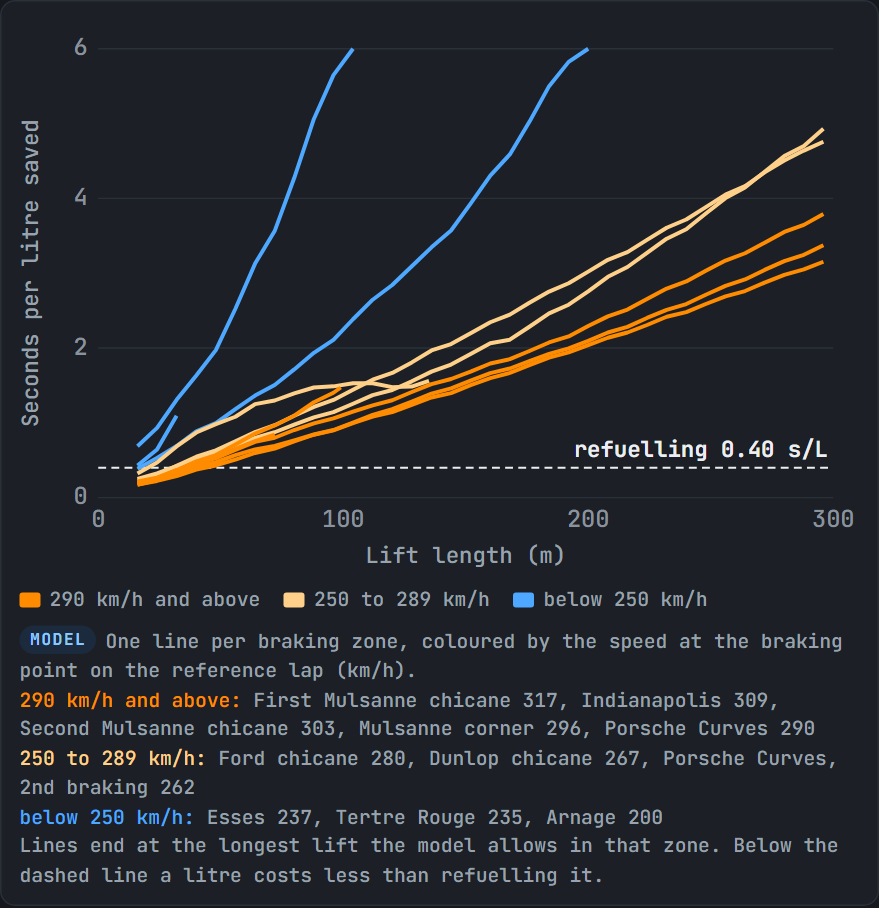
The chart shows this for every braking zone. The faster the car at the braking point, the flatter the line and the cheaper each litre. Every line rises with lift length, so in every zone the first metres are the cheapest. Only the first few metres before the fastest braking zones stay near the refuelling line.
Speed is the best single hint, but it does not decide alone. A zone is cheapest when the car no longer accelerates before the braking point and the braking after it is hard. Before the second Porsche braking the car is about as fast as before the Dunlop chicane and no longer accelerates either. But the braking there is short and light, so the coasting car runs almost parallel to the braking line and meets it late: a 48 m lift moves the braking point 27 m, against 9 m at Dunlop. Over all that distance the car is slower than at full push, so the same lift costs about 60 % more per litre. Lift even longer and the car never meets the braking line. It drops below the corner speed and you have to get back on the throttle, which is pure lost time. That is where the lines in the chart end.
For the 12 lap stint you need 0.11 L per lap. Spread the cheapest way, that is these lifts before your normal braking point, worth 0.033 s per lap in total:
| Corner | Lift for 0.11 L per lap | Lift for 0.2 L per lap |
|---|---|---|
| Dunlop chicane | 24 m | 48 m |
| Esses | 16 m | 32 m |
| Tertre Rouge | 8 m | 16 m |
| First Mulsanne chicane | 32 m | 56 m |
| Second Mulsanne chicane | 32 m | 56 m |
| Mulsanne corner | 24 m | 48 m |
| Indianapolis | 24 m | 48 m |
| Arnage | 8 m | 16 m |
| Porsche Curves | 24 m | 40 m |
| Porsche Curves, second braking | 16 m | 24 m |
| Ford chicane | 24 m | 40 m |
Model values in 8 m steps. Short lifts everywhere beat one long lift. The 100, 200 and 300 m boards help you find your marks.
Where real drivers lose time
We compared where the drivers actually coasted with the best way to save the same fuel. Before the braking zones at the end of the long straights they coasted 61 to 86 m on average, where 36 to 45 m would do. Before the shorter straights they hardly lifted at all (2 to 5 m), where 13 to 34 m would be cheap.
Over 88 laps where they saved fuel, they saved 13.5 L for 11.3 s of lap time. Spread optimally, the same fuel would have cost 6.8 s. That is a gap of about 0.05 s per lap, or 39 % less time for the same litres. A long lift is easy to feel and easy to repeat. The short lifts are where the cheap litres are left.
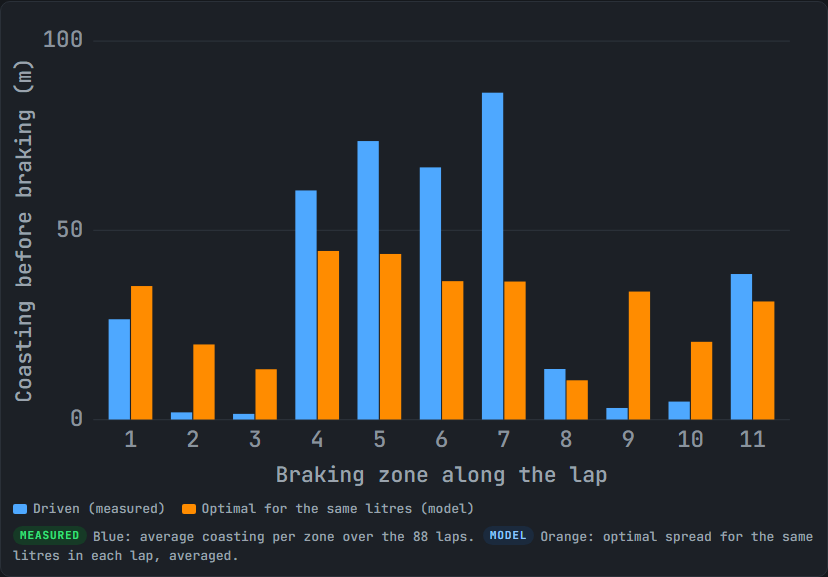
Zones 1 to 11 in the chart are the corners of the table above, in lap order.
Full push or always a little lift?
In this guide, full push means the reference lap with no lift at all. It is the baseline for every calculation. In a race the answer is more subtle.
Fuel: every litre you do not refuel saves 0.40 s in the pit at 2.5 L/s. In a 12 lap stint it is also not carried, which makes it worth up to about 0.53 s. The first 0.08 L per lap of lifting cost less than that. So the cheapest short lifts pay even when the stint length stays the same, as long as you really take less fuel at the stop. Tyres: a short coast takes load and sliding out of the tyres. You also brake from a lower speed, so the brakes heat up less and pass less heat into the tyres. That makes lift and coast a tool to steer tyre temperatures. When the tyres run too hot, lift a little more. When they run cold, for example at night, lift less (section 8). Balance: when you lift, weight moves to the front before you brake. For many drivers the car then turns in more easily. In other cars it makes the rear nervous. Try it corner by corner.So the question per braking zone is: is this litre cheaper than refuelling it, and does the lift help the tyres and the car's balance? At the top level these small decisions add up to the gap between drivers.
3. How robust is 12 laps?
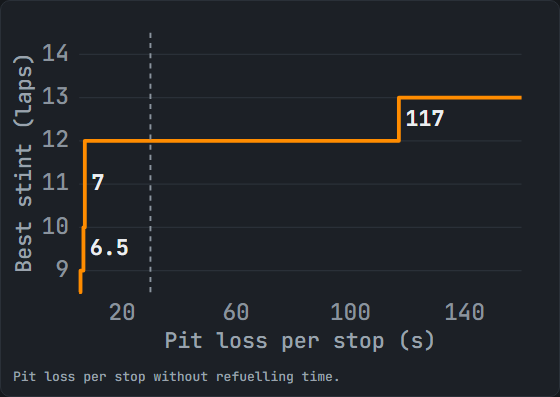
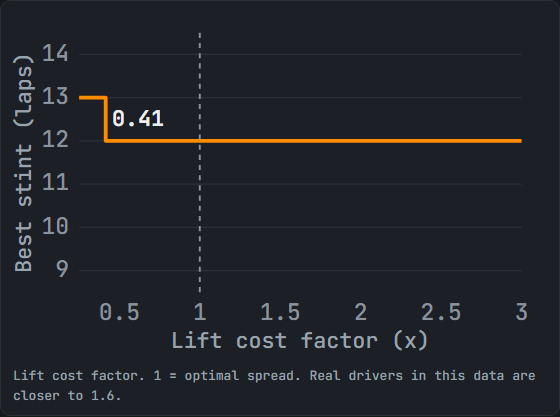
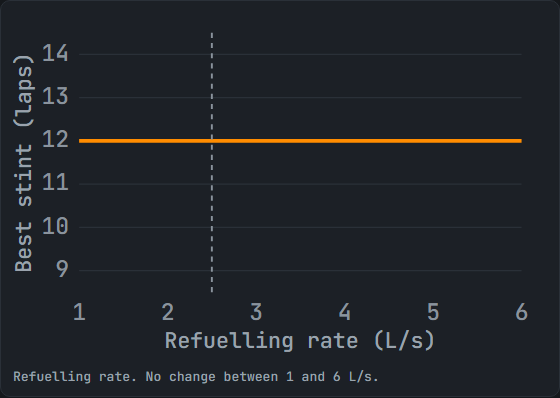
We changed one value at a time. Twelve laps stay best for pit lane times from 7 to 116.5 s and for any refuelling rate from 1 to 6 L/s. Even at 1.6 times the optimal lift cost, which is where the real drivers are, 12 laps stay best.
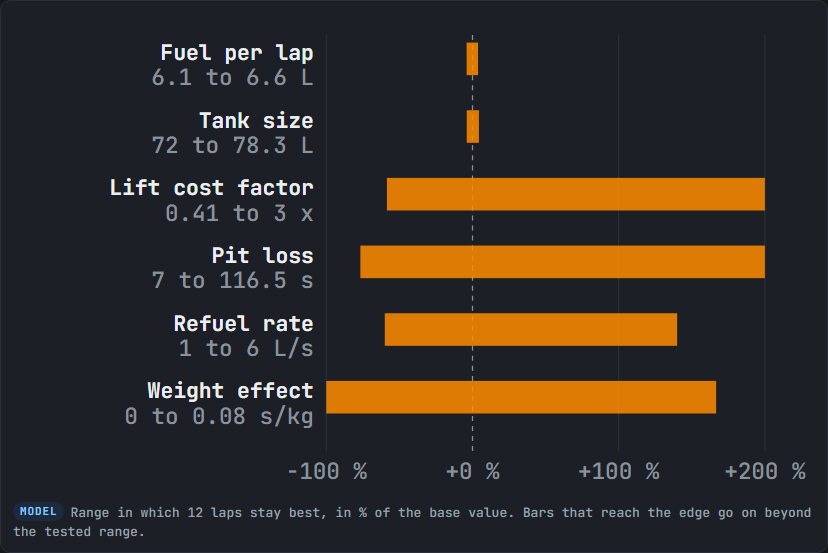
Fuel per lap and tank size are the two sensitive levers. Below 6.10 L per lap, or with a tank above 78.3 L, 13 laps become better. Above 6.60 L per lap, or below 72 L of tank, 11 laps win. That is only about 4 % either way. So check your own consumption before you copy the plan, and redo it for any car with a different tank.
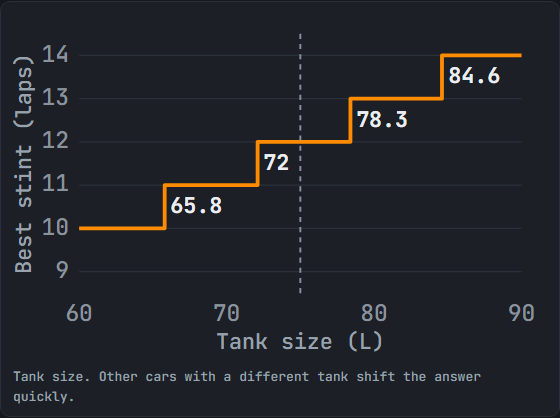
The other four values hardly move the answer:
- Pit lane time: this is the drive through the pit lane alone, refuelling comes on top. 12 laps stay best from 7 to 116.5 s per stop. Only above about 117 s do 13 laps pay, and below 7 s the stop is so cheap that shorter stints win.
- Lift cost: even if lifting costs 3 times the optimum, 12 laps stay best. Only below 0.41 times the optimum would 13 laps win.
- Refuelling rate: no change anywhere between 1 and 6 L/s.
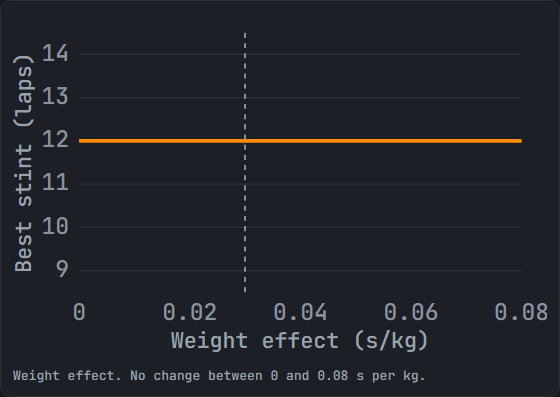
- Weight effect: no change anywhere between 0 and 0.08 s per kg.
4. How much fuel to start with
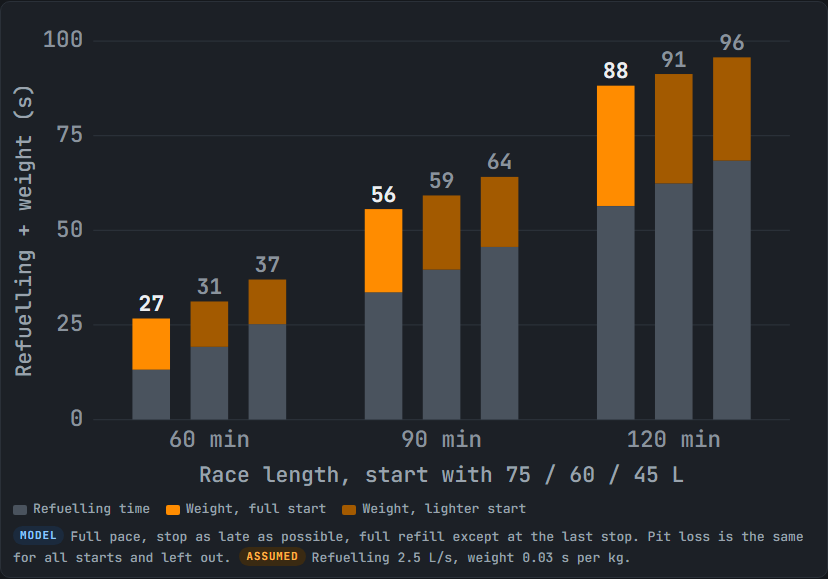
Start on a full tank and stop as late as the tank allows. Every litre in the car at the start is a litre you do not refuel later, and refuelling costs 0.40 s per litre. Carrying that litre to the first stop costs about 0.0222 s per lap, so 0.24 s over 11 laps. The refuelling time is bigger, so the full start wins.
| What changes | Full start stays best up to | Then |
|---|---|---|
| Weight effect | about 0.04 s per kg (base 0.030) | start with a little less fuel, a few laps short of a full tank |
| Refuelling rate | about 3 L/s (base 2.5) | a lighter start pays |
| Race without a stop | never needed | race fuel plus a reserve |
In LMU refuelling and the tyre change happen one after the other, so a tyre change does not hide the refuelling time. In a series where work runs in parallel, refuelling can become free, and then a lighter start pays.
The chart compares a full start with 60 L and 45 L at full push. The full start is the cheapest in all three race lengths.
5. Race by race
A 90 minute race
At the median pace the race runs 25 laps. At full push that needs 158.9 L, which means two stops. With lifting, one stop is enough: a 13 lap stint with about 0.59 L of lift per lap and a 12 lap stint with about 0.11 L.
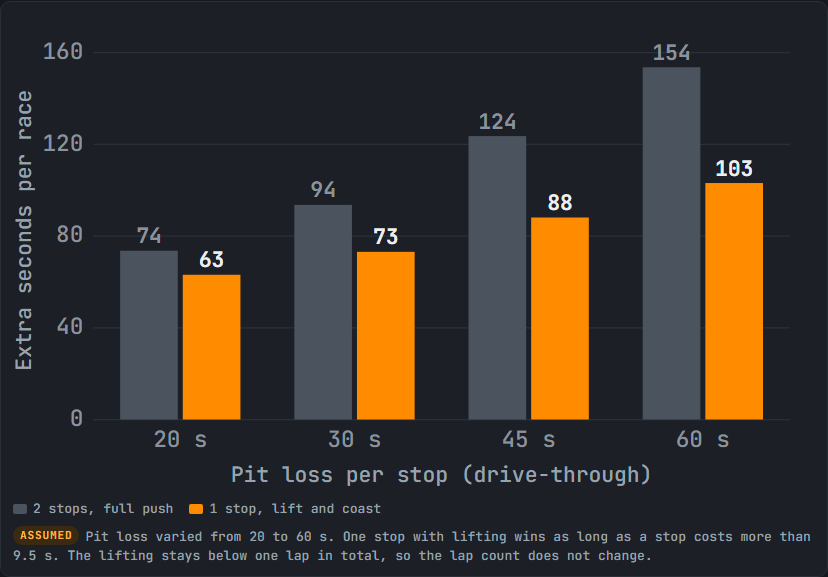
- 2 stops at full push: 2 x 30 s in the pit plus 83.9 L of refuelling (33.6 s). Total 93.6 s.
- 1 stop with lift and coast: 30 s in the pit plus 75 L of refuelling (30.0 s) plus 13.1 s of lifting. Total 73.1 s.
One stop wins as long as a stop costs more than 9.5 s. The lifting stays below one lap in total, so the lap count does not change. With the measured median consumption of 6.26 L instead of 6.36 L the lifting drops to 8.8 s in total.
Every race length
The same model for other race lengths, with a 30 s pit loss and the median pace of 3:37.377. Each stint may use one tank.
| Race | Laps | Fuel at full push | Stops at full push | Best plan |
|---|---|---|---|---|
| 45 min | 13 | 82.6 L | 1 | No stop, lift 0.59 L per lap. 12.7 s instead of 33.1 s |
| 60 min | 17 | 108.0 L | 1 | 1 stop at full push |
| 75 min | 21 | 133.5 L | 1 | 1 stop at full push |
| 90 min | 25 | 158.9 L | 2 | 1 stop with lift. 73.1 s instead of 93.6 s |
| 120 min | 34 | 216.1 L | 3 | 2 stops with lift. 116.3 s instead of 146.4 s |
| 2.4 h (144 min) | 40 | 254.2 L | 3 | 3 stops at full push. 161.7 s instead of 196.5 s with 2 stops |
The 2.4 hour race: when lifting does not pay
40 laps need 254 L at full push, so three stops with four stints of 10 laps. No lifting needed for the stint length (for the cheap lifts that still pay, see "Full push or always a little lift?" in section 2). To save a stop, the three stints would have to be 14, 13 and 13 laps long. That needs 1.00 L of saving per lap in the 14 lap stint and 0.59 L in the others, and costs 76 s of lifting. The saved stop is worth 30 s in the pit plus 11.7 s less refuelling, not enough. Two stops only win once a stop costs more than about 65 s.
The rule behind it: lifting pays when the total lift cost over the race is smaller than what the saved stop is worth. In the 90 minute race that is 13 s of lifting against 33.6 s saved. In the 2.4 hour race it is 76 s against 41.7 s.
6. Lifting in traffic
When the road is free, every metre of lift costs time. Behind a car you cannot pass before the next corner, the car ahead sets your arrival at the braking zone. Lifting until you are right behind it at the braking point costs nothing extra. You arrive at the same moment you would have arrived anyway, with fuel saved.
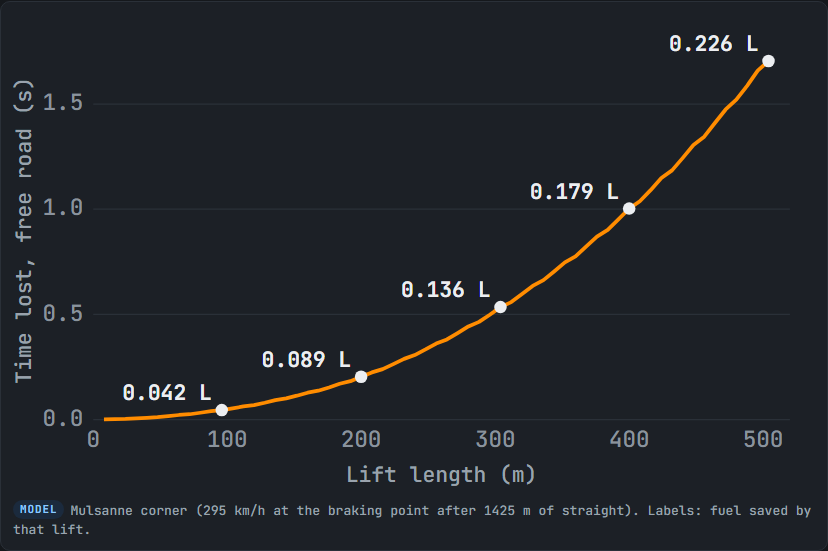
Example from the model, at the end of the straight before the Mulsanne corner: if traffic costs you half a second there, a lift of about 300 m fits into that half second and saves 0.136 L. That is about 2 % of a lap's fuel. The rolling car also arrives slower, so it can brake later and turn in on its own line. Then go to full throttle from the apex and pass on the exit. You give up the chance to pass on the brakes, so only do this where you would not pass there anyway.
7. Short shift or lift and coast?
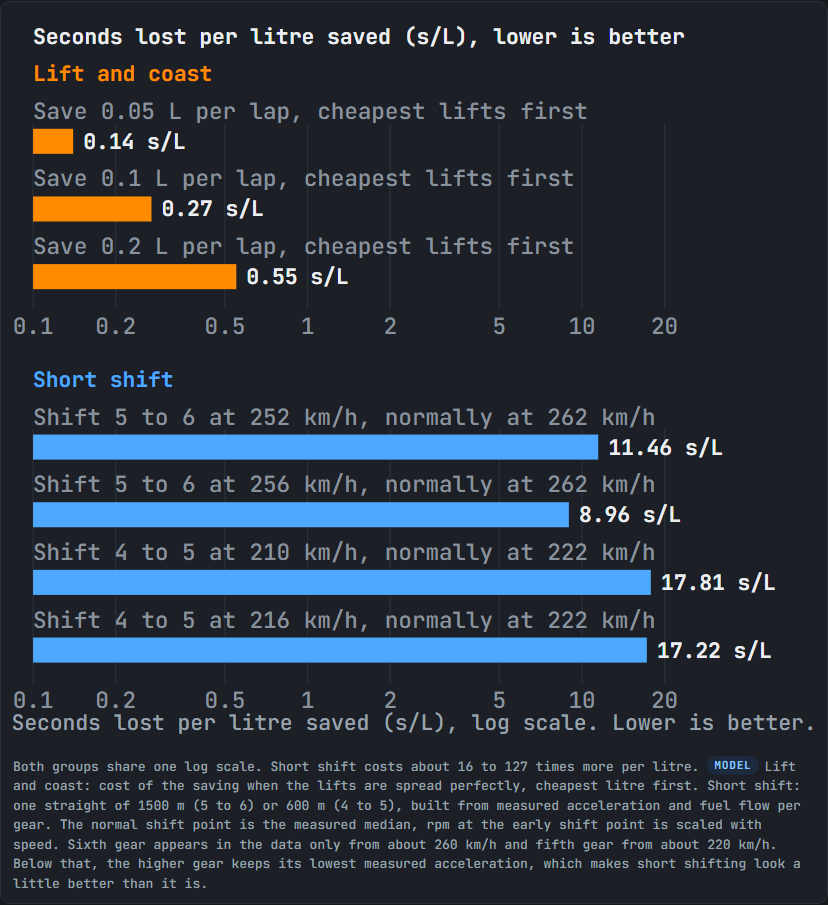
Lift and coast. The laps contain gear and rpm along the whole lap, so we measured acceleration and fuel flow in each gear and drove a straight on paper with the normal and an earlier shift point. The drivers almost always shifted into sixth at the same point, a median of 7788 rpm.
- Short shift 5 to 6 at 252 km/h instead of 262 km/h, on all 8 straights that end in sixth: 0.048 L saved per lap, 0.55 s lost.
- Lift and coast at the cheapest places: 0.05 L saved per lap, 0.007 s lost.
An earlier upshift lowers fuel flow while the car still accelerates, and that is exactly when the time is lost. A lift at the end of a straight happens when the car has done its acceleration and is about to brake anyway. Per litre, short shifting costs 16 to 127 times as much.
8. And the tyres?
Experience shows that lifting takes load and sliding out of the tyres. The car also arrives at the braking zone slower, so the brakes turn less energy into heat, and less of that heat reaches the tyres. Wear and temperatures drop a little. In practice laps like these the effect is small and hard to separate from normal lap to lap variation.
Use it as a lever for tyre temperature. If the tyres run above their window, more lift and coast brings them down. On a cold track it works the other way. The tyres run cooler and can fall out of their window, and then they wear faster. At night, lift less, or only as much as the fuel plan needs.
How to use this in your own races
- Measure your fuel per lap and work out how many laps the tank allows at full push.
- With the Oreca at Le Mans, one extra lap per tank is worth it in a long race. Two extra laps only pay when they save a whole stop.
- Start on a full tank and stop as late as the tank allows.
- Take short lifts before every fast braking zone before you lift longer anywhere. Leave the slow corners alone.
- Even at full push, take the cheapest short lifts if they save refuelling time or help the car.
- In this car, do not short shift to save fuel.
For the engineers: why a saved litre counts double
At 2.5 L/s every litre you refuel keeps you 0.40 s longer in the pit. The first 0.08 L per lap of lifting cost less than that, so they pay in any race where the refuelling time sets the length of the stop.
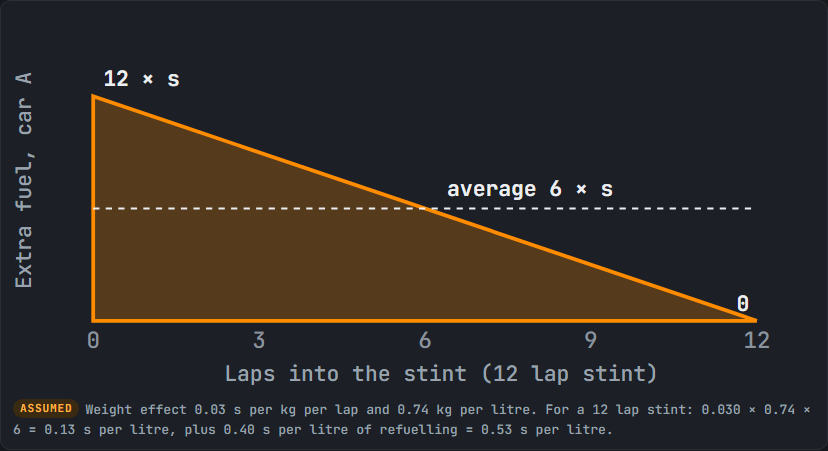
A saved litre also does not have to be carried. Take two cars on the same plan. Car A runs at full push, car B saves s litres per lap over a 12 lap stint. At the stop before the stint car B takes 12 × s litres less. Right after the stop car A carries that whole difference, at the end of the stint nothing. The difference falls in a straight line, a triangle, so on average a saved litre is not carried for half the stint. In a 12 lap stint that is 6 laps, worth another 0.13 s. So lift and coast pays up to about 0.53 s per litre.
| Stint | Litre carried on average | Weight cost per litre | Refuelling per litre | Lifting pays up to |
|---|---|---|---|---|
| 8 laps | 4 laps | 0.089 s | 0.40 s | 0.49 s/L |
| 12 laps | 6 laps | 0.133 s | 0.40 s | 0.53 s/L |
| 16 laps | 8 laps | 0.178 s | 0.40 s | 0.58 s/L |
Method
- Laps: Oreca 07, Le Mans, LMU, recorded with our telemetry tool. 150 valid full laps, no out laps. For comparisons, 120 laps: without laps more than 1 % slower than the session median and without the first flying lap after refuelling. Traffic cannot be identified in the data.
- Fuel is recorded in kg and converted with 0.74 kg per litre.
- Lift costs are simulated on the reference lap for every braking zone and lift length. The coast speed comes from a coast table, the braking curve from the reference lap.
- Coasting is measured as distance with no throttle and no brake above 100 km/h. Inside one session, every 100 m of coasting saved 0.028 L.
- Short shift costs are built from full throttle samples of all laps, per gear and speed.
- Comparisons are made inside a session, with the fuel load as a control, so track conditions and setup stay the same.
- Pit loss (30 s), refuelling rate (2.5 L/s) and weight effect (0.03 s per kg per lap) are fixed values of the strategy model. All laps are practice laps. Safety car periods are not in the data.
- Drivers are anonymous. Comparisons inside a session use drivers A and B, who did 146 of the 150 laps.
The analysis was made with Improveyourlaptime (improveyourlaptime.com).